A filter that can create a subtle but interesting effect has to do with motion blur. The faster and closer to us things move in the real world, the more blurred they appear. And with the right filter, you can recreate this effect on the screen as well.
The circles moving in the hexagon below, for example, the faster they move, the more blurred I make them to mimic the feeling of fast movement. I came across an example of a “motion filter” while seeing images being blurred while sliding across the screen in an image gallery demo. Since data visualization also often shows movement, I wanted to see what I could do with it.
SVGs beyond mere shapes blog series
This blog is part of the SVGs beyond mere shapes tutorial series. It’s based on the similar named talk. My goal with the talk was to inspire people to experiment with the norm, to create new ways of making a visual more effective or fun. Even for a subject as narrow as SVG filters and gradients, there are more things possible than you might think. From SVG gradients that can be based on data, dynamic, animated gradients and more, to SVG filters for creating glow, gooey, and fuzzy effects. You can find links to all the other blogs in my kick-off article here.
Setting up the filter
The essence of this filter is super simple. It’s not even a combination of filters, which seems to be more common, but just a Gaussian blur. The only caveat is that this blur is made in one direction (say, the horizontal direction) instead of over the entire shape equally. However, making it look good visually actually involves a few more steps.
You can read more about the filter region here
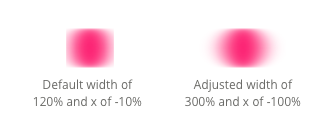
Let’s start by setting up a simple filter. As in the gradient case, we have to nest a filter within a defs element. Then we can append a filter element and give it a unique id to reference it later on. Due to the nature of the blur we also have to make some changes to the region where the filter is allowed to bleed into. The blur will increase the width (or height) of the object’s appearance. Normally a filter can bleed into a region of 120% in the horizontal and vertical direction around the bounding box of the object (the smallest rectangle that can enclose the shape). With these motion blur effects, however, we will often need more than 120%. It depends on how much blur you apply, but values around 300% are more typical I find. Therefore, we increase the filter region with the width attribute. To make sure this region will still be centered in the middle of the object, we have to move it back a bit with the x attribute (whose default is -10%).
When chaining filters, you can also supply the result of a previous filter into the next step, instead of the SourceGraphic
Now you can start appending as many filter techniques as you want. But as said before, here we only need one: a feGaussianBlur. With the in attribute set to SourceGraphic, we mean that the filter should use the element onto which the filter is applied as the base. Because we want to control the appearance of the amount of blur during motion I give the gaussian blur a class. That way I can easily select it later on. Finally, we set the amount of blur with stdDeviation. When you only supply one value, it does a blur in all directions. But when you supply 2 values, the first belongs to a blur along the x, or horizontal, direction and the second belongs to the y, or vertical, direction.
Finally, we can apply the filter to any SVG element by setting the filter style of the element to the filter’s unique id with url(#filter-id)
//Always start by appending a defs (definitions) element
var defs = svg.append("defs");

//Initialize the filter
defs.append("filter")
    .attr("id", "motionFilter") //Give it a unique ID
    //Increase the width of the filter region to remove blur "boundary"
    .attr("width", "300%")
    //Put center of the "width" back in the middle of the element
    .attr("x", "-100%")
    .append("feGaussianBlur") //Append a filter technique
    .attr("class", "blurValues") //Needed to select later on
    .attr("in", "SourceGraphic") //Apply blur on the applied element
    //Do a blur of 8 standard deviations in the horizontal
    //direction and 0 in vertical
    .attr("stdDeviation", "8 0");

//Apply the filter to an element
d3.select(".element").style("filter", "url(#motionFilter)");
In the image below you see examples of applying a blur of 0, 2, 4, 6 and 8 stdDeviation in the vertical direction.

Note For Safari you need to explicitly set the color-interpolation-filters attribute of the filter to sRGB, otherwise, the colors seem faded out (see this question on StackOverflow)
Change the filter during motion
The static image above was simple to create, but we only want to create a blur when something is moving. That means that we have to transition the stdDeviation value of the filter during movement. Although d3 can do many transitions quite easily, it doesn’t know how to transition a stdDeviation attribute (and I don’t blame it). Luckily, the transition step only needs some help from the attrTween method together with a custom interpolator.
There are two steps during a movement of an element, such as a circle:
- The speed-up when we want the element to increase in blur
- The slow-down when the element is stopping and the blur should go back to 0
Therefore, we have to first transition the stdDeviation of the filter from 0 to, say, 8 during the speed-up and afterwards, transition it back from 8 to 0 during the slow-down. Here is the code with two transition steps:
Edit 2018 | Strangely enough, animating from / to 0 now gives a flicker at the start or end. You can therefore go to 0.1 instead. When I say 0 in this blog, I really mean 0.1 in your code.
//Interpolate the motion blur
d3.select("#motionFilter .blurValues") //select the feGaussianBlur
    //Step 1: start of a circle movement
    //transition the filter from 0 blur to a heavy blur
    .transition().duration(300).delay(300)
    //Change the values of stdDeviation and initialize an interpolator
    //that runs from 0 to 8 for the first number in stdDeviation
    //in 300 milliseconds
    .attrTween("stdDeviation", function() {
        return d3.interpolateString("0.1 0", "8 0");
    })
    //Step 2: end of a circle movement
    //transition the filter from heavy blur to a 0 blur
    //besides the interpolator now going from 8 to 0 the rest
    //is the same as above
    .transition().duration(300)
    .attrTween("stdDeviation", function() {
        return d3.interpolateString("8 0", "0.1 0");
    });
Let me explain. First, select the feGaussianBlur using the filter’s id and the class we gave it. Start a transition as normal with the transition, duration and delay steps (I find that a small delay to the blur after a movement starts looks better). Instead of supplying an attribute such as opacity and its new value, we now tell the transition that we want to do something with the stdDeviation attribute using attrTween. What attrTween should return are the values that stdDeviation should become. For example, 0 0 at the start, to 1 0 a small amount of time later, to 8 0 at the end.
See the d3 wiki page for a slightly longer explanation of d3.interpolateString and see all the other interpolator options available.
I first had a more complicated function in the attrTween, but thanks to Amelia Bellamy-Royds for pointing out that interpolateString was enough. With interpolateString, d3 will interpolate between all the numbers within the string. The interpolator runs from the first (set of) number supplied to it, to the second (set of) numbers within the time given by the duration attribute. And as a very nice bonus, it will also take into account the easing function/shape (the default is circular).
And that was for the speed-up. However, for the slow-down we can just copy the whole transition and paste it again. We only have to change the first number in the string in the interpolator to go from 8 to 0. You do have to play around with the durations and delays of these two transitions when you apply them to your moving elements to see what looks best.
Below you can see the result of applying this to two circles. They are both undergoing the same motion blur at the same time, but only one of them is also moving while this happens.
Moving along an angle
The blur can only be performed in either a horizontal or vertical direction. But what if your objects are moving along an angle? Then you will have to rotate the elements so that either the new horizontal or vertical direction (in the rotated system) will lie along the angle. This might involve some math if the angles are different per each datapoint, so I’ll leave it up to you to decide if your data visualization is too complex to use with the motion blur.
Also, you can create a separate motion blur filter for each of your datapoints so that you can adjust each filter dynamically when the datapoints are not moving at the same time (such as in the hexagon example at the top). Or in the example below where I’ve created a somewhat exaggerated motion blur when the balls are flying outward and back into the center. Each circle has its own filter that gets pushed from a 0 0 stdDeviation to a heavy blur whenever the corresponding circle is moving.
Strangely enough, there seems to be some crispening artifact on the circles when the filter is applied in Chrome and Firefox (doesn’t matter which filter though). Not sure why this is, if any of you know how to fix this, I’d love to hear!
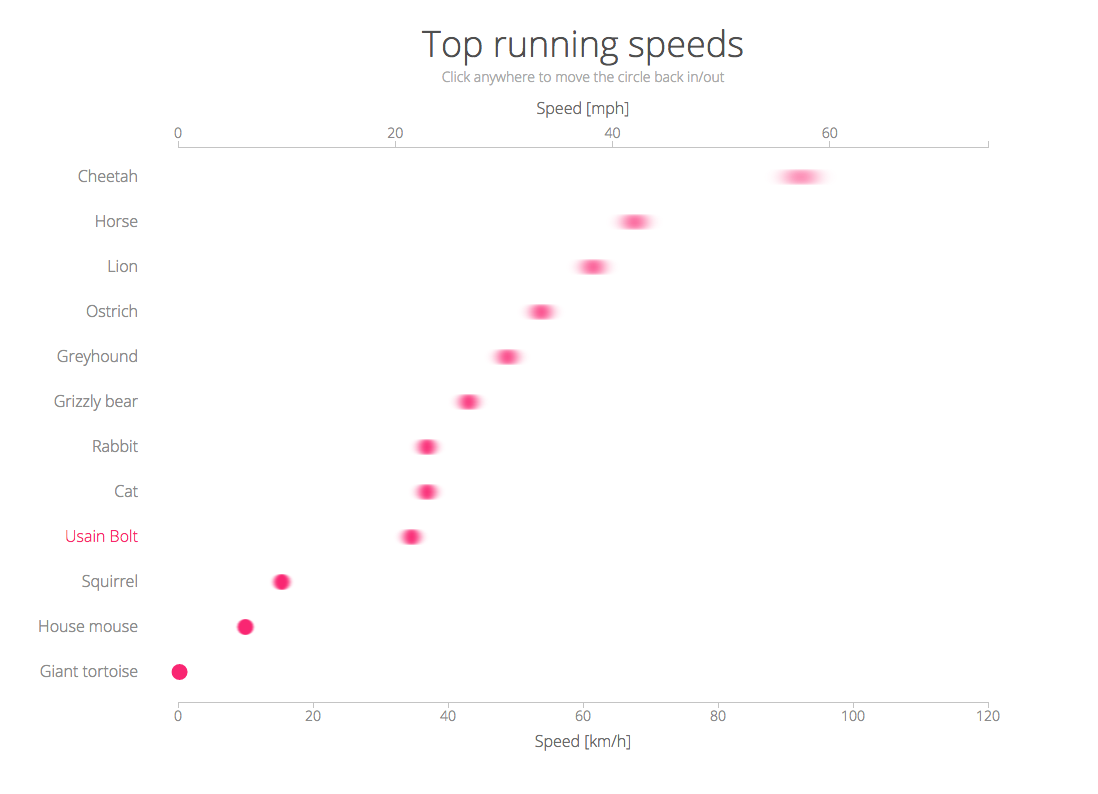
Top running speeds
For an actual data visualization example, I thought that visualizing the top running speeds of some animals and the fastest human seemed appropriate. When the circles fly out, they get blurred and the amount of blur depends on how fast they move (i.e. how far they have to move outward).
To make this blur depend on the data, we only have to make a small adjustment to the interpolator. Pick a maximum blur that you want, say 12. Then find out which value is the maximum in the dataset (which will be the Cheetah in this case). The value that the interpolator should go to for each animal then depends on how much slower this animal goes in comparison with the Cheetah. See the lines below for the small changes:
//Max speed in dataset (Cheetah)
var maxSpeed = d3.max(animals, function(d) { return d.speed; });
//Max motion blur that I want
var maxBlur = 12;

//Make the blur of each animal depend on its speed
//So the slower they move, the smaller the blur
d3.interpolateString("0.1 0", (d.speed * maxBlur / maxSpeed)+" 0");
Don’t forget to adjust this interpolator in both the speed-up and slow-down. Once this is done, you get the result below which is a screenshot of the outward movement that also nicely shows the blur (although you don’t notice it that severely when they are moving, which is a nice thing). The interactive version can be found here.
The Code
The code for all the examples that were showcased in the blog can be found here:
- Simple circle moving back and forth
- Circles moving at an angle in and out of center
- The top running speeds of animals
- Circles moving back and forth in hexagon
I really enjoy the motion blur effect for its subtle dedication to details to make it more life-like I guess. If you’ve made any visualizations while using this motion blur effect, please share them in the comments below or let me know on Twitter, I’d love to see them!
SVGs beyond mere shapes blog series
If you’re interested in seeing more examples of how SVG gradients or SVG filters can be used to make your data visualization more effective, engaging or fun, check out the other ±10 blogs that are available. You can find links to all of the blogs in my kick-off article here.